Preparing your yard for sod installation is a fundamental step in lawn making. This process involves several steps that are critical to ensuring the successful growth and development of your new lawn. The first step is typically the removal of any existing grass or weeds, which can compete with the sod for resources. Next, you need to grade the yard to ensure proper drainage and prevent water from pooling in certain areas. Lastly, it’s important to prepare the soil by adding fill dirt, which provides a healthy foundation for your sod.
Sod, also known as turf grass, is essentially pre-grown grass that comes with a layer of soil held together by its roots or other materials. It’s often used because it provides an instant lawn solution and helps control erosion immediately compared to growing grass from seeds which takes time. Sod comes in various types such as Bermuda, St Augustine among others each suitable for different climates and uses.
On another note,fill dirt is just as crucial in this process as it refers to earthy material used to fill up low areas in yards or create mounds or hills. It usually contains subsoil rather than topsoil, free from organic matter that could decompose leaving voids in filled spaces over time; hence providing stability when compacted making it ideal for creating solid foundations where needed like under sidewalks and driveways besides raising low lying areas before installing sod on them.
Clearing the Yard
The first step in clearing the yard is to remove any existing vegetation, especially weeds. Weeds compete with sod for water, sunlight, and nutrients. They can be removed manually or by using a herbicide. If you choose to use a herbicide, make sure it’s safe for your particular type of grass and always follow the manufacturer’s instructions.
Next is removing rocks and other debris from the installation site. Rocks can interfere with the roots of your new sod and prevent it from establishing correctly. They also make it difficult to level your yard properly before installing the sod. Using a garden rake or shovel can help you easily identify and remove these obstacles.
Lastly, once all vegetation has been removed along with any debris including sticks or leaves that could inhibit growth, give your yard one final thorough check-over before moving on to grading or adding fill dirt as described previously; ensuring no missed weeds are lingering about that might re-emerge later causing problems after installation.
Remember that achieving a clean slate here is imperative as this directly affects how well your new lawn will take root and establish itself successfully in its new environment; hence making this initial preparation process one not worth rushing through but rather investing time into doing thoroughly right from start.
Soil Testing and Amendment
Soil testing is an essential part of preparing your yard for sod installation. It provides critical information about the composition and health of your soil, including its pH level and nutrient content. These factors can significantly impact the growth and vitality of your new lawn. Without this knowledge, you may find that your sod struggles to take root or fails to thrive.
Collecting a soil sample involves digging several holes in different areas around your yard, each approximately 6 inches deep. From these holes, remove slices of soil from the top down to about 6 inches deep and place them in a clean bucket. Mix these samples together thoroughly before placing a small amount into a bag or container for testing – typically available at local garden centers or through online services.
Once you receive the results from your soil test, it’s time to amend the soil based on feedback. If the pH level is too high (alkaline), you might need to add sulfur or peat moss; if it’s too low (acidic), lime could be required. Nutrient deficiencies can be addressed by adding specific types of fertilizer depending on what’s lacking according to test results.
Keep in mind that amending soil isn’t an overnight fix but rather something that improves over time with repeated applications as necessary based on continued testing; hence why conducting regular tests even after installing sod remains important for maintaining optimal lawn health moving forward.
Level and Grade Yard
After clearing the yard and amending the soil, it’s time to level and grade your yard. This process is crucial in ensuring that water drains properly from your lawn, preventing standing water which can lead to various lawn problems such as diseases or damage to the sod.
Leveling the yard involves smoothing out any bumps or depressions in your yard so that it’s even. You can do this by using a lawn roller or a wide landscaping rake. Start by filling any low spots with topsoil or fill dirt, then use your tool of choice to flatten out high spots and smooth everything over. It’s important not to compact the soil too much during this process as overly compacted soil can prevent proper root growth.
The next step is grading, which refers to creating a slight slope away from buildings for good drainage while maintaining an overall flat appearance for aesthetic purposes.
To achieve this, you should aim for approximately a 2% slope; meaning for every 10 feet away from your house, there should be about 2-3 inches drop in height. Use stakes and string lines as guides during this process if necessary ensuring accuracy.
Remember that both leveling and grading are critical steps in preparing your yard for sod installation because they help ensure good contact between sod roots and underlying soil besides preventing future lawn problems related to poor drainage.
Properly executing these steps will set you up nicely moving forward with actual sod laying thereby increasing chances of successful establishment after installation making all prior preparation efforts worthwhile indeed!
Sod Selection and Installation
There are several varieties of sod available, each with its own pros and cons. For example, Bermuda grass is drought-tolerant and can withstand heavy foot traffic making it ideal for large lawns or sports fields but it doesn’t do well in shaded areas. St Augustine grass thrives in warm climates and has a high tolerance for salt making it suitable for coastal areas however, it’s not very tolerant to foot traffic. On the other hand, Fescue varieties are great for cooler climates with good shade tolerance but require more water compared to Bermuda grass.
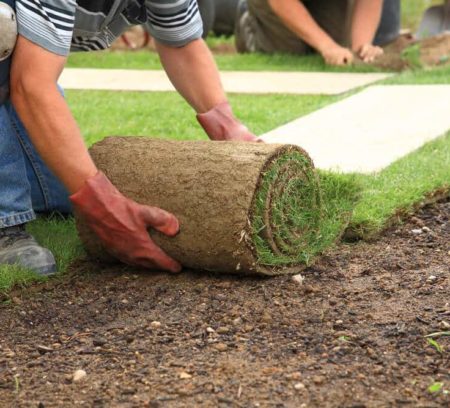
After selecting the appropriate sod type based on your specific needs and yard conditions, you’ll want to start laying out the sod. Begin by laying out one row along a straight edge such as a driveway or walkway then continue laying subsequent rows ensuring edges fit snugly against each other without overlapping while also staggering seams like brickwork pattern would look like; this helps prevent erosion along seams later.
Once all your sod is laid down, you’ll need to press it into place using a lawn roller filled with water which promotes good contact between roots of new sod pieces and underlying soil necessary for successful establishment.
Remember that proper installation is just as important as selection when working with sod; hence why taking time doing both correctly will yield best results in terms of achieving an aesthetically pleasing lawn that’s also healthy long term.
Lastly,watering immediately after installation plays an essential role too since new turf requires plenty moisture initially so as not dry out before roots have chance grow into underlying soil establishing themselves properly.
Therefore always ensure sufficient watering especially during first couple weeks after installing new turf so as give your newly installed lawn best possible start towards thriving successfully long term!
Post Installation Care
After your sod is installed, it’s important to give it the care it needs to ensure its survival and proper growth. The first step in post-installation care is watering. Newly laid sod requires a lot of water; you’ll want to deeply water the lawn immediately after installation, ensuring that both the sod and the top inch of soil beneath are thoroughly soaked.
Next up is mowing. Wait until your new grass reaches about 3 inches high before mowing for the first time, which usually takes one or two weeks depending on grass type and growing conditions. When you do mow, be sure not cut more than one-third of grass height at once as this could stress out new turf; hence why also making sure mower blades are sharp so they cut rather than tear grass blades promoting healthier growth overall.
In addition to watering and mowing,feeding newly installed sod with appropriate fertilizer based on prior soil test results plays a crucial role in promoting healthy growth too.
Note however that timing here matters since applying too soon could burn tender roots while waiting too long might starve them instead; generally speaking though applying between 4-6 weeks after installation often works well for most turf types unless otherwise advised by local experts or extension services.
Lastly, remember that patience is key during post-installation period as establishing a lush green lawn takes time besides consistent effort taking care of it properly.
Paying attention to these tips will go a long way towards ensuring success with your newly installed sod thereby reaping rewards from all prior preparation efforts put into achieving this goal!


 By Admin

